Note: It is important that you have a basic knowledge of Xero and that you are able to setup a ‘New Organisation’ as a trial. For the purposes of the initial test you can use the default Xero chart of accounts. We do not support integrations that are not carried out by members of Arthurs financial team. To see costs for us to integrate the two systems please go to the store.
Under this scenario all of the transactions in Xero related to contacts mapped to Arthur will be copied into your Arthur account (which must be empty of any transactions). At the end of the initial integration syncing process, the tenant & property owner ledgers in Arthur will reflect their respective ledgers in Xero. All of the transactions during the first time synchronisation will be copied FROM Xero TO Arthur. All the steps below are there to ensure that your Xero processes and reports don’t change. First Arthur and Xero must be prepared for the integration
- Ensure that all the tenancy information in Arthur is complete and up to date. Please make sure that every unit has a property owner assigned to it.
- Set up the recurring charges for each tenancy in Arthur ensuring that the next collection dates are at an agreed point in time for the integration to go live, i.e. immediately following the date that you would stop the recurring charges in Xero. You don’t want Arthur and Xero charging rents for the same period!
- Ensure that the recurring charge types (i.e. Rent Charge or Direct rent) are setup appropriately for your respective tenancies, depending on whether you own the units or are managing them for someone else (ask Arthur support for help if you are not sure).
- Go into Xero and create 5 contact groups (Tenant, Registered Deposit, Contractor, Property Owner, Letting Agent) (please spell them exactly as shown). To create a group, go into contacts and click on the ‘New’ option next to ‘Groups’


5. Add all of your tenants, property owners, letting agents and contractors into these respective groups.

6. Establish which income and expense accounts you are using in Xero for all of your tenant rent charges, disbursements and credits. In effect, we need to ensure that every transaction for your tenants has an equivalent income/expense code in Arthur. These codes will be created in Arthur later.
7. If you are managing properties on behalf of landlords, and are producing monthly statements for them, follow Step
8. If you own the properties you manage, you will not be producing conventional landlord/property owner statements so this step will not apply. 8. Do the same for contractors – you may choose analyse your contractor invoices into all sorts of different headings (i.e. gardening, common part repairs, rates etc.). 9. Make a note of your bank accounts in Xero – you will need to enter these into Arthur later. 10. The integration makes use of both sets of tracking codes. If you are intending to rethink how you report on tracking codes, now is a good time to consider the change. If you don’t use tracking codesArthur will create two groups by default. Group One will be for all of the units and Group Two will be for the properties. The tracking codes in Xero will be mapped to the respective units in Arthur later.
Now move into the Arthur. The two systems must now be ‘linked’ for the integration process to work.
- Create the bank accounts that you use in Xero. Arthur has a default bank account already setup, you will need to edit the name and bank details to reflect the main rent account you use in Xero. You must ensure that all the bank accounts are set to a Bank Transfer and the account name, number and sort code details are entered. Go to ‘Settings’ on the top right hand side of the Arthur menu and choose Bank Accounts.

2. You now need to start mapping all the various elements to pull the two systems together. To do this, Arthur and Xero must first be connected. Go to Financials > Go To Xero Screen > Synchronise with Xero
You will then be directed to a screen where you will need to login to your Xero account and authorise it for use with Arthur.

Once this has been completed, you will be returned to the Arthur mapping screen where you can now configure the mappings.

You will now start to map the account codes, bank accounts, contacts for Property Owners, Letting Agents and Contractors. You will also set up tracking codes for tenancies and units.
- Click on ‘Mapping Account Codes’ and the following window will open. Here you will simply map the Arthur codes on the left to the Xero Codes on the right. You do not need to map ‘receipts’ as these go directly to bank accounts in Xero, not income or expense accounts. It is quite normal for these fields to remain ‘white’. When you have finished press Save. The first time you open this screen it may take up 30 seconds before it populates. Please be patient, Arthur is automatically working out the mappings.

2. Click on ‘Bank Accounts’ and map. Press ‘Save’ when complete

3. Now map ‘Contacts’. The work you did in Steps 3 – 5 will determine what appears on this screen. If you have missed assigning any contacts to their respective groups in Xero, they won’t appear on the right hand drop-downs. If this is the case, go back to Xero rectify the issue and try again.

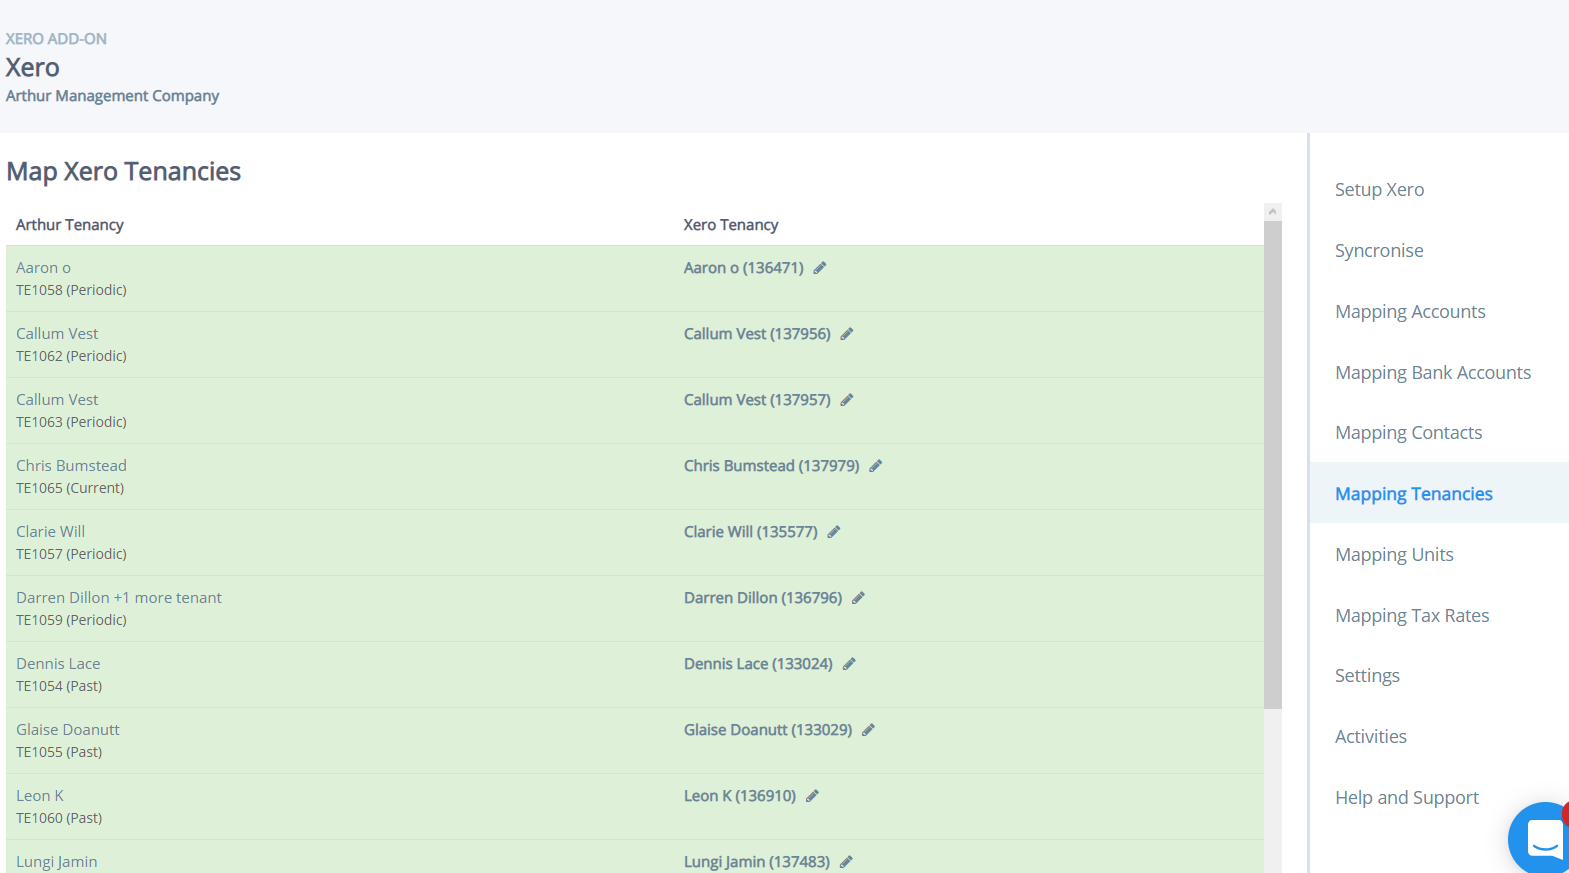
4. Now map tenancies. The work you did in steps 3 -5 will affect what you see on this screen
If you have already set up tracking codes in Xero, you will need to click on the ‘Settings’ option first and map the tracking codes – If not ignore the next step. 5. If tracking codes are already setup in Xero, please map the 1st and 2nd group as shown below.

Then map the tracking codes.

6. Now map units. This part of the mapping determines how the tracking code fields are populated each time a transaction is created in Xero. 7. Synchronise the systems & check the following reports: Once all mapped your Setup Xero screen should resemble the one below (full with ticks). You can then run your first sync with Xero.
- Arthur Tenant balances report agrees with Xero Aged Receivables report (only including contact in "Tenant" group)
- Arthur Property Owner balances report agrees with Xero Aged Payables report (only including contacts in "Property Owner" and "Contractor" group)
- Tenant Deposit balances report in Arthur agrees with the deposit balances held in Xero.


Attachments (14)


Was this article helpful?
That’s Great!
Thank you for your feedback
Sorry! We couldn't be helpful
Thank you for your feedback
Feedback sent
We appreciate your effort and will try to fix the article